Showing posts with label Indexes. Show all posts
0

Computed Columns

Posted by Danielle Smith on 15:16 in
Good afternoon everyone! Today I am going to be discussing Computed Columns and how they can be implemented to speed up your queries.

What Is A Computed Column?

A Computed Column is a combination of other columns within the same table. Once you have created a Computed Column, you can index it.

In order to speed up your queries, a computed column with an index applied will make queries use an index or table seek rather than an index/table scan which adds more to the query cost (for more information on these, please visit my previous blog post on Graphical Execution Plans)


How Do I Define and Index a Computed Column?

Firstly, you will be starting off with a query similar to the one below. It's searching through my Item table and it's counting the number of items that were created in October (10th month of the year).


I decide to add a Non-Clustered Index to the column to speed up the query in the first instance: 


And this is the Execution Plan as seen below: 


As you can see, we have an Index Scan there which could potentially slow our query down if it becomes larger (so has more conditions in the WHERE clause and has JOINs added) and if it's bringing back more data. However, if you create a computed column like in the example below, you can change this Index Scan into a more economical Index Seek: 


Next, add a Non-Clustered Index onto this new column: 


Now when we try and run the same query as we did in the beginning: 


We retrieve the following Execution Plan:

This is now an Index Seek rather than an Index Scan. Note that I didn't have to reference the new computed column in the new query. This is a handy feature in SQL Server to make it possible to add computed columns to an index without having to modify any SQL Statements or queries to use the new index, it picks it up automatically.

You will now notice an increase in speed between the 2 different queries! This may seem negligible for smaller databases but when you're bringing back large data sets and then add as many computed columns as possible, you will notice a significant improvement to your query performance.

What Next...

Tomorrow, I will be discussing Partitioning Tables - which is quite a large but important subject as they reduce the amount of work needed to be performed, therefore also speeding up the performance of the query.

As A Final Word...

Thank you for reading today's blog post! If you have any questions/comments/feedback, please leave them in the comments section below and I will get back to you as soon as I can. Alternatively, please like my SQL Genius Facebook Page and leave a message on there.

0

Indexed Views

Posted by Danielle Smith on 16:06 in
Good afternoon everyone!

So, now you know how to create indexes on columns of your choice within your tables using both the User Interface and also in SQL Code as well. This purpose of today's mini blog is to show you how to add Indexes to your Views.

Why Would I Add An Index To A View? 

Adding Indexes to a column greatly increases the performance of reads against that particular table. Seeing as Views are SELECT statements joining other tables to form one returning result set, it means that the performance of your views can be greatly increased using Indexes as well.

Because you will rarely update a View (as it will have an impact on any Tables related to it and you will most likely receive an error message), it means that you will gain from the benefits of Indexes but will not suffer the negatives (slower writes).

However...


Note that once indexes are applied to a view, it will now actually store data rather than just provide the lookup to it. If data is modified within any of the tables that the view is based on, the view will automatically update.

Things You Need To Consider...

When indexing a view, the first index has to be a UNIQUE Clustered Index. However once this has been created, you can add as many Non-Clustered Indexes as you need.

However before you begin adding the UNIQUE Clustered Index, you will need to:

  • Ensure that the SET options are correct for all tables that will be referenced in the view; existing and tables you are creating.
  • Ensure that WITH SCHEMABINDING is on. 
  • Ensure that the view definition is deterministic.

For a full list of all SET options for Indexed Views, take a look at the link below:


There's quite a large list of requirements needing to be met before you can create your Index on your View, however once these have been met the actual creation of the Index is exactly the same as creating Indexes against a table, only you reference the View instead of the table (as shown below): 


What Next...

Tomorrow, I will be discussing Computed Columns, another method of potentially speeding up your queries. Stay tuned!

As A Final Word...

Thank you for reading today's blog post! If you have any questions/comments/feedback, please leave them in the comments section below and I will get back to you as soon as I can. Alternatively, please like my SQL Genius Facebook Page and leave a message on there.

0

Creating Indexes

Posted by Danielle Smith on 15:07 in
Good afternoon everyone! Today I will be discussing Indexes, what they are, why they are useful and how they can be implemented within your database. I have used Indexes quite a lot in the working environment, especially on larger projects where vast amounts of data need to be brought back to the user.

What is an Index? 

Indexes are a type of data structure which is used to increase the performance and speed of retrieving data from a data table. There are 2 different index architectures in SQL Server; Clustered and Non-Clustered.

Clustered Index

A Clustered Index stores database table rows physically on the disk in the same order as the index. However, because of this, there can only ever be one Clustered Index on a specific table.

Non-Clustered Index

A Non-Clustered Index contains a list of pointers to the original row. So when the query is called, the pointers point to the correct rows in the database. You can have as many Non-Clustered Indexes on a table as you like.

The UNIQUE Constraint

Both types of Index architecture can be declared as UNIQUE. This means that they have a unique constraint placed on them, so that each value occurs only exactly once. Note that there is no such thing as a UNIQUE Index as an additional architecture! Clustered and Non-Clustered Indexes can both have the UNIQUE constraint applied to it (so they become UNIQUE Clustered Index and UNIQUE Non_Clustered Index but you will never have just a UNIQUE Index).

Types of Index

There are also 4 different "types" of Index:

Dense

A file with pairs of keys and pointers for every data row in a data file. Every key references a pointer that points to a particular data row in the sorted data file.

Sparse

A file with pairs of keys and pointers for every block (or sequence of bytes) in a data file. Every key references a pointer that points to a particular block in the sorted data file.

Bitmap

The majority of the data within the data file is stored within bit arrays (bitmaps) and performs bitwise logical operators on these bitmaps in order to point to the correct data rows.

Reverse

A reverse key reverses the key value before it is entered into the index.

Why Are They Useful?

Indexes are used as a way of making your queries run faster.

Generally, Clustered Indexes are quicker to read from, but they are slower to write to as the data in the table may need to be rearranged to fit accordingly. Clustered Indexes are usually used on ID columns.

Non-Clustered Indexes are slower than clustered indexes at reading, however you can have as many Non-Clustered Indexes as you like, plus there is no need to reorder the data if more data is added. Non-Clustered Indexes are usually used on non-ID columns, typically on columns specified in WHERE and ORDER BY clauses.

How Can They Be Implemented In My System? 

The below examples show Indexes being added to a database system. You can add Indexes both via the User Interface and via SQL statements:

Non-Clustered Index


User Interface:
In order to view the Indexes that already exist on a table, click on your Table Name > Indexes. As you can see from the example below, there are already 2 Indexes in existence. It's usually a good idea to name your indexes appropriately in order to make it easier to distinguish. As a rule, I declare my indexes using the following convention: "Ix_TableName_ColumnName".

  • What they actually are (Ix_ is an Index, Sp_ is a Stored Procedure, Fn_ is a Function etc.).
  • What table the Index is found on.
  • What column the Index is on. 


To add a new Index, right-click the Indexes folder and click on New Index > Non-Clustered Index... (as you can see from this example, because we already have a Clustered Index on this table, the option to add another one has been greyed out):


Next, you have to add the Index Key Columns by clicking on Add: 


...and then select the table column(s) you wish to place the Index on from the multi-select list: 


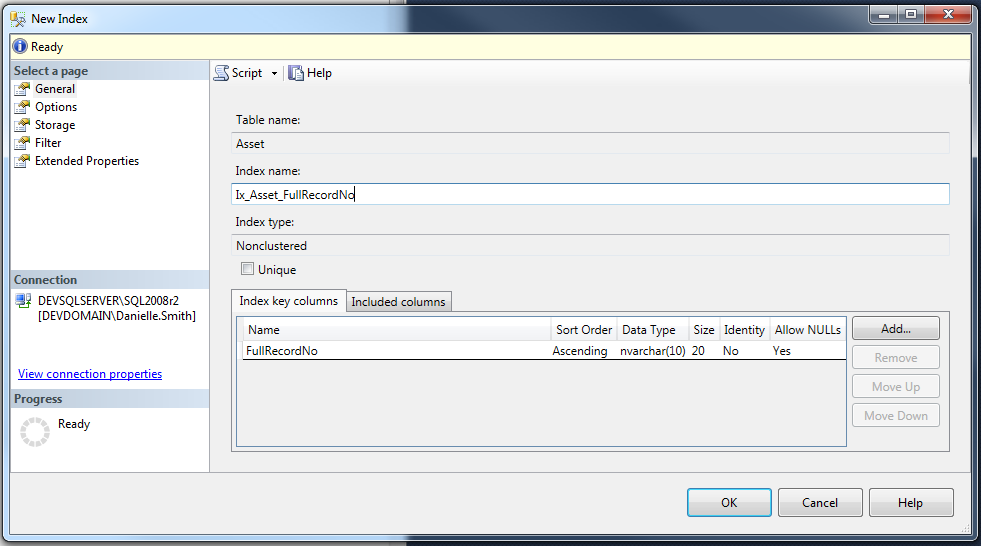
Now you should see your added Index columns in the table at the bottom of the screen (see visual below). You can add multiple and you can also add Included columns as well. If you want to make your Index UNIQUE, make sure that the Unique check box has been ticked. Once you're happy with your Index (and don't forget to give it an appropriate name!), click OK: 


After refreshing the Indexes folder, you can now see that the new Index has been added with the others in the list: 


SQL Code: 

The snippet of SQL code below will produce exactly the same result as above (it's totally up to personal preference which method you wish to undertake but it's valuable to know both): 


Clustered Index


User Interface:
As mentioned previously, in order to view the Indexes that already exist on a table, click on your Table Name > Indexes. As you can see, in this example there are no indexes at all. This is because in this example, I am creating the first index on the table; a clustered index on an ID column.


Right-click the Indexes folder and click on New Index > Clustered Index...:


Next, you have to add the Index Key Columns by clicking on Add: 


...and then select the table column(s) you wish to place the Index on from the multi-select list: 


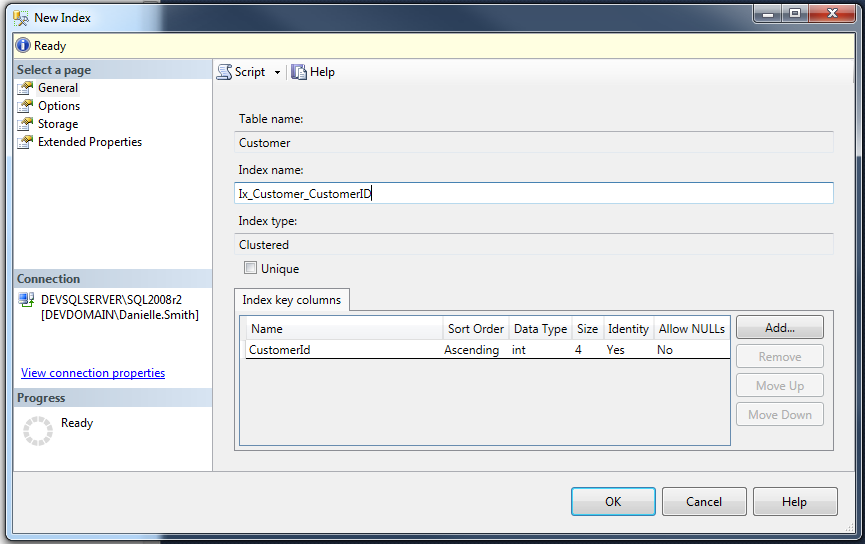
Now you should see your added Index columns in the table at the bottom of the screen (see visual below). You can add multiple and you can also add Included columns as well. If you want to make your Index UNIQUE, make sure that the Unique check box has been ticked. Once you're happy with your Index (and don't forget to give it an appropriate name!), click OK: 


After refreshing the Indexes folder, you can now see that the new Index has been added to the list: 


SQL Code: 

The snippet of SQL code below will produce exactly the same result as above (it's totally up to personal preference which method you wish to undertake but it's valuable to know both): 


 What Next...

Tomorrow, I will be looking at creating Indexes on Views as they can greatly improve the speed in which you return your data to your users.

As A Final Word...

Thank you for reading today's blog post! If you have any questions/comments/feedback, please leave them in the comments section below and I will get back to you as soon as I can. Alternatively, please like my SQL Genius Facebook Page and leave a message on there.

Copyright © 2009 SQL Genius - Personal Development of a Junior All rights reserved. Theme by Laptop Geek. | Bloggerized by FalconHive.