Showing posts with label Stored Procedures. Show all posts
0

SQL Server Database Mail (Intro)

Posted by Danielle Smith on 17:05 in , ,
Good afternoon everyone!

Today, I will be discussing Database Mail, which is one of the SQL Server Manageability Features. This is only going to be an introduction as the database administrator should be the person who handles the management of the database, however I will end up covering this is much more detail at a later date (as I will start to discuss the more administrative parts of database handling).

What is Database Mail? 

Database Mail allows the SQL Server instance to send email messages with attachments to specific users. This can be useful when you want weekly reports (which aren't formatted) to be sent to certain employees to give them an update on the information stored within a particular database table.

Prior to SQL Server 2005, SQLMail was the service provided, however this was replaced with Database Mail (with SQLMail included for backwards compatibility only). Database mail communicates using SMTP (Simple Mail Transfer Protocol) and doesn't require third party software such as Microsoft Outlook or Windows Live Mail, which makes it especially suitable for use on especially dedicated database servers.

Benefits? 

So how can this benefit me in my development? Well... the features of Database Mail allow you to integrate email messaging along with your applications. All you need to do initially is configure Database Mail so it's linked to the SMTP account. For more information on how to do this, please read the following link:

http://databasebestpractices.com/configure-database-mail-sql-server-2008-r2/

Sp_send_dbmail and Associated Arguments

Once this step has been completed, you will have access to sp_send_dbmail (the pre-defined stored procedure for sending email messages via Database Mail) and all of its associated arguments:

  • @profile_name
    • The name of the mail profile where the message is sent from. 
  • @recipients
    • The email addresses of the people who intend to receive the message in the "To" field. 
  • @copy_recipients
    • The email addresses of the people who intend to be in the "CC" field. 
  • @blind_copy_recipients
    • The email addresses of the people who intend to be in the "BCC" field. 
  • @subject
    • The text that forms the subject line of the email message. 
  • @body
    • The content of the message. 
  • @body_format
    • States whether the email will be sent in text or HTML format. 
  • @importance
    • Sets the importance level of the message to either "Low", "Normal" or "High". Normal is the default value.
  • @sensitivity
    • Sets the privacy level of the message to either "Normal", "Personal", "Private" or "Confidential". Normal is the default value.  
  • @file_attachments
    • The list of file names that you wish to attach to your email message, each one separated by a semi colon (;). 
  • @query
    • Defines a query for the system to execute. 
  • @execute_query_database
    • Executes the query stored in @query. However if no query is defined then this argument will be skipped. 
  • @attach_query_result_as_file
    • A bit value that determines whether the results of the query should be returned as an attachment (1) or within the body of the email (0). However if no query is defined then this argument will be skipped. 
  • @query_attachment_filename
    • The file name of the attached query result. However if no query is defined or if the @attach_query_result_as_file returns 0, then this argument will be skipped. 
  • @query_result_header
    • Determines whether the column heading names will be included in the returning result set. However if no query is defined then this argument will be skipped. 
  • @query_result_width
    • Sets the number of line characters when formatting a returning query result set. The default is 256 characters. However if no query is defined then this argument will be skipped. 
  • @query_result_separator
    • Specifies the query result column separator character. The default is set to a space. However if no query is defined then this argument will be skipped. 
  • @exclude_query_output
    • A bit value which shows if there was an error with the query. 0 means that the query error message is being displayed on screen in the messages tab. 1 means that the command completed successfully, even if the query in the stored procedure has failed. 
  • @append_query_error
    • A bit value which indicates whether a message has been sent or not when a query error occurs. 0 means that the email message wasn't sent, and 1 means that the email was sent however the error message that did occur was attached to the email. 
  • @query_no_truncate
    • A bit value which can be set to determine whether a large column in a result set should be truncated (shortened). The default is 0, where the columns truncate to 256 characters. However it is possible to modify truncation options to increase or decrease that length, or set the @query_no_truncate to 1 which turns of truncation completely. 
  • @mailitem_id [OUTPUT]
    • Outputs the mailitem_id of the message. 


Modifying Configuration Settings of Database Mail

The following stored procedures can be used to modify the configuration settings of Database Mail:

  • sysmail_configure_sp
    • Configures Database Mail parameters. 
  • sysmail_help_configure_sp
    • Displays the current settings for Database Mail.
  • sysmail_help_queue_sp
    • Displays information on status and mail queues. 
  • sysmail_delete_mailitems_sp
    • Permanently deletes Database Mail tables from the system. 
  • sysmail_delete_log_sp
    • Permanently deletes Database Mail logs from the system.
  • sysmail_start_sp
    • Starts Database Mail.
  • sysmail_stop_sp
    • Stops Database Mail. 

Conclusion

And that is my introduction to SQL Server Database Mail. In the future, I will be posting more about managerial features in SQL, so please stay tuned for those other the coming weeks.

As A Final Word...

Thank you for reading today's blog post! If you have any questions/comments/feedback, please leave them in the comments section below and I will get back to you as soon as I can. Alternatively, please like my SQL Genius Facebook Page and leave a message on there.

0

Stored Procedures (Part 4) - Cursors

Posted by Danielle Smith on 12:12 in
Hi everyone! Today's blog post is a continuation of Stored Procedures (Part 1), Stored Procedures (Part 2) and Stored Procedures (Part 3) which I would strongly recommend reading before reading this one.

Today, we will be discussing database cursors and their uses within T-SQL. I have come across them briefly when working on our main project, primarily within triggers. We have used them to apply custom IDs to our multiple record types to allow for multiple records being added simultaneously where you want it on a row by row basis but not on a set basis. In my own mini-project portfolio, I have also demonstrated my knowledge by creating something similar. 

What are Cursors? 

Cursors are used when you want to iterate through every single row in a table to do something to it (and work in a similar way to loops, which you may already be aware of in other programming languages). Usually, you would want to process sets of data as it is much faster however there are occasions where you can't, and therefore have to use a cursor. 

Cursors are split into multiple parts: 

Firstly, you declare the cursor. You give it a name and define the SELECT statement that the cursor will run through:


Next, you open the cursor which causes the SELECT statement to be executed and the result set is stored within the database memory. Without this statement, the cursor will not work at all:


The FETCH statement is then used to retrieve each row of data from the cursor. Not only should this be included at the beginning of the cursor, but it should also be used just before the END statement. Otherwise, the operation will only be performed on the first data row continuously in a recursive loop and not the rest of the rows.


Usually, a WHILE loop is used to iterate through the rows and this is where the conditions are placed for when the loop should continue to loop (exactly the same kind of principles as a while loop in any other kind of programming language). In this instance, the WHILE loop is being iterated while the @@FETCH_STATUS = 0:


The function @@FETCH_STATUS will return a value depending on the next row in the result set:

  •  0 - The FETCH statement was successful and has returned a new row, 
  • -1 - THE FETCH statement failed or the row that was attempted to be retrieved went beyond the result set declared in the initial SELECT statement. 
  • -2 - The row fetched is missing (or may have been deleted) from the result set. 

Next, you will need to encapsulate any operations that need to be applied to each individual row in the result set within a BEGIN and END statement:


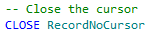
After the END statement, make sure that you close the cursor:


After closing the cursor, by habit you should deallocate the cursor as it reclaims any memory space used up. This is not necessary within Stored Procedures as when the Stored Procedure exits, it automatically closes and deallocates the cursor. However within Triggers and Functions, it may not. So just to be on the safe side, I would always make sure that I manually close and deallocate the cursor, like below:


And that is how to declare a default (FAST_FORWARD) cursor.

What Types of Cursor Can I Declare? 

Within SQL Server, there are 4 different cursors that you can declare and use: 

FAST_FORWARD (or FORWARD_ONLY or READ_ONLY) Cursor 

This is the standard default cursor that you can create (as shown in the example above). It is the fastest of all cursors that you can declare however it will only allow you to move through the result set forwards one row at a time. Scrolling is not allowed.

STATIC Cursor 

STATIC cursors push the result set into a temporary table in the database and all FETCH statements will be from that temporary table. Scrolling is allowed but no modifications can be made, it is read only. 

KEYSET Cursor 

KEYSET cursors places the unique keys of each row in the result set into a temporary table. Scrolling is allowed and modifications can be made, however any inserts into underlying tables will not be available to the KEYSET cursor. 

DYNAMIC Cursor 

DYNAMIC cursors are the most costly to use (in terms of memory allocation and speed). The cursor will have all modifications made available to it. 

Different FETCH Statements

Not only can your cursor be customised by one of the 4 types listed above, different FETCH options can also be declared. In the example above, I used FETCH NEXT which is possibly the most commonly used option. However (as knowledge to myself and other readers of this blog) I am going to list some of the others and their purposes: 

FETCH FIRST

FETCH the first row in the result set.

FETCH LAST

FETCH the last row in the result set.

FETCH NEXT

FETCH the next row in the result set dependant on the current position of the cursor in the result set.

FETCH PRIOR

FETCH the previous row in the result set dependant on the current position of the cursor in the result set.

FETCH ABSOLUTE n

FETCH the nth row from the beginning of the result set. Note that you can't use FETCH ABSOLUTE n when using a DYNAMIC cursor. 

FETCH RELATIVE n

FETCH the nth row forward dependant on the current position of the cursor in the result set. 

The Downside To Using Cursors 

In performance terms, cursors should be avoided as they can be incredibly slow. However there will be times where an action can only be completed by using a cursor. If this is the case, you may need to use other query optimising techniques in order to increase performance and data return speeds. Query performance optimising will form a later blog post as it is essential to the success of a database application, particularly from the user's point of view. 

And As An End Note... 

The 4 Stored Procedure blogs that I have written should cover the majority of what is required both in the work place and also for the relevant Microsoft exam. My next blog posts will focus on User-Defined Functions and how they are used within T-SQL. Keep your eyes peeled guys! If you have any questions or feedback, please don't hesitate to comment below. 

0

Stored Procedures (and their vulnerabilities!) (Part 3)

Posted by Danielle Smith on 12:12 in
Good afternoon everyone! Today's blog post is a continuation of Stored Procedures (Part 1) and Stored Procedures (Part 2), which I would strongly recommend on reading before reading this one.

As mentioned on Friday, we will be looking at the safe execution of Stored Procedures. I say the safe execution because it is possible to be vulnerable to what is known as SQL Injection Attacks, where a hacker will try to steal your data via the code used in the Stored Procedure. It is incredibly important to make sure that you code defensively to try and avoid such events occurring.

What are SQL Injection Attacks? 

SQL Injection attacks are a form of exploit when a hacker can steal vital data via SQL statements where a user input has not been protected properly. However not only can they steal data, they can use this data as an advantage to modify data, delete it and even compromise the whole database entirely. Every developers worse nightmare, right?

Bugs in programming code are one of the major flaws in software which allows hackers to misuse any information that they manage to retrieve, which can be catastrophic when dealing with private and confidential data.

Types of SQL Injection Attacks

There are many different types of Injection Attacks that a hacker can use, which I am going to detail more in this section.

Exploit Injection Attacks

An exploit attack involves the hacker focusing on the login page of the application to steal log in information such as usernames, email addresses and passwords in order to gain access to the database system. Quite often, they drop the user table to make it impossible for any user to log onto the system. They may also use access to the user table to modify one of the user's passwords and then gain access to all of their personal information, which could potentially contain private and financial details as well.

Error Based Injections 

An error based injection attack involves generating and manipulating error messages in order to discover the entire back end database structure, which would obviously help the hacker in compromising the system. The key problem here is when error messages are not tidied up properly, and therefore display tables and field names.

Union Based Injections 

A union based attack involves the hacker joining tables together to reveal even more information than what is stored within a simple table. This may be more difficult if the hacker has no idea what structure the database has, however if successful can have even more devastating effects.

SQL Command Injections 

SQL command injections allows a hacker to not only inject SQL commands into a system, but execute commands as well. This is why you must really protect your stored procedures as much as possible because if a hacker can manipulate them, you really are in big trouble as it can cause mass data loss, data corruption and even the loss of an entire database.

Blind Injection Attacks 

Blind Injection Attacks are usually random attacks used by hackers to determine the vulnerability of a web application. This may be the hacker's first port of call to see just how secure the system is and to determine what other attacks should be used in order to achieve their goal (whether it be just bring a system to a stop, drop tables or drop an entire database). Blind Injections are a trial and error approach as the hacker would need to use their imagination and guess.

Timed Injection Attacks 

A Timed Injection Attack is a method of attack that uses the BENCHMARK() operator to delay server responses if an expression will evaluate to be true. This is one way of a hacker discovering a password, one character at a time. Similarly to Blind Injection Attacks, Timed Injection Attacks rely heavily on trial and error.

What is Defensive Programming? 

Defensive programming is the art of protecting yourself against issues when creating a piece of software by formulating a list of all the possible scenarios on why a piece of software would not work in the way it has been intended before actually hard coding.

Defensive programming has three main goals:
  • To improve the general quality of the software produced – therefore reducing the number of issues and bugs. 
  • To make sure that the code works correctly and appropriately, not only with expected user inputs but also with unexpected user inputs (testing in unique conditions). 
  • Make the source code comprehensible to a software audit. 
If you plan how to tackle vulnerability issues before they arise, your application will be much safer and reliable to use. Note that it is also vital to use some form of security testing software on your applications before they are sent to the customer, as the last thing you want is to compromise their data.

How Can Defensive Programming Prevent Attacks?

Unfortunately, any live database application is subject to attacks from hackers. But luckily, there are simple steps that a developer can take in order to prevent all of the above attacks from having a detrimental effect on your database.

Stored procedures can actually help prevent SQL Injection Attacks as they parameterise queries. This means that the developer has to define and pass in parameters which make it more difficult for an attacker to manipulate your queries for their own requirements. However, you will need to avoid using dynamically generated queries within the procedure itself, otherwise a vulnerability has been created and can be exploited. If you do need to use dynamic generation and execution however, you must ensure you adhere to the following:

Escape all User Input

Where escape characters are used around the query. The following blog post (not written by myself, so kudos to the owner!) describes escape characters (and other useful methods of preventing SQL Attacks): http://blogs.msdn.com/b/raulga/archive/2007/01/04/dynamic-sql-sql-injection.aspx

Appropriate Validation

For usernames for example, make sure that the data type is only a certain length and that the text box entry on the web application form itself can only store a certain number of character or usernames with no spaces etc.

There are other ways for you to prevent attacks on other parts of your database system too:

  • Turn off error reporting to minimise the risk of Error Based Injections 
  • Modify the connection to the web server to only allow enough privileges for normal use.
  • Ensure that configuration choices for the server are suitable.

To Be Continued...

Part 4 will focus on: 
  • Cursors. Stay tuned!

0

Stored Procedures (Part 2)

Posted by Danielle Smith on 12:39 in
Good afternoon everyone! Today's blog post is a continuation of Stored Procedures (Part 1), which I would strongly recommend on reading before reading this one as it will give some more background knowledge before we begin.

As mentioned yesterday, we will be tackling error messages, return codes and error handling.

Error Messages

Error messages in SQL Server appear in the Messages tab at the bottom and consist of 3 parts as highlighted below:

  • Error Number
  • Severity Level
  • Error Message


Error Number (or Return Codes) 

An error number is given to every error that SQL Server produces. It is simply an integer ID number (similar to a return code you may receive on a standard Windows error) which makes it easier to search for a solution. Error messages that come with SQL Server are numbered from 1 to 49999, however number 50000 is reserved for an unspecified error message and you can create your own custom messages that take numbers 50001 and above.

Severity Level

SQL Server assigns a severity level (from 0 to 25 inclusive) to any error that occurs. Each number is included within a band:

  • Error level 16+ is logged in the SQL Server error log. 
  • Error level 19-25 can only be accessed by members of the sysadmin user role. 
  • Error level 20-25 are considered fatal errors and any transactions are rolled back. 


Error Message

You can view all messages available to be displayed to the user by typing in the following command in the Query Window:


The error message is the sentence displayed to the user to explain what the error was.

Custom Error Messages

As said previously, you can create your own custom error messages, which take error code numbers from 50001 and above. To create a custom error message, you can execute the following code:


It is also possible to add the error message to its own language settings, like in the example below:


Error Handling Within Stored Procedures

Error handling is incredibly important, regardless of the application type, as it needs to be as user friendly as possible. For example, take a look at the two examples given below: 

Example 1: 


Example 2: 


I'm sure you will agree with me when I say that Example 2 is a much more useful error message as it explains what the problem is and provides an error code as well. As a user, I would prefer the second example any day. Therefore, it is vital to include error trapping methods, not only in the application itself but also in the stored procedures within the database, in the off chance that something may not be working as it should be. You could use XACT_ABORT at the start of your transactions as it will break out and roll back if a error occurs however, it can work with unpredictable results and is not very user friendly. It is much better to use a TRY ... CATCH block, something which you may be familiar with as it features in many other programming languages. 


TRY ... CATCH

During my commercial experience, I have used TRY ... CATCH blocks in C# and the concept is really very similar in SQL (as the flow chart diagram below shows):


However you need to consider:

  • The CATCH block must follow the TRY block immediately.
  • TRY ... CATCH blocks can be nested within each other. 
  • If there is an error within the CATCH block, it will be returned to the application unless it is nested within another TRY ... CATCH block. 
  • Transactions can be either committed or rolled back, depending on whether the error is in a committable state.
  • You can use the following functions to pass back to the application user: 
    • ERROR_NUMBER() - Displays the error number. 
    • ERROR_MESSAGE() - Displays the error message.
    • ERROR_SEVERITY() - Displays the error severity.
    • ERROR_STATE() - Displays the state of the error:
      • 1: An open transaction that can be committed or rolled back. 
      • 0: No open transaction.
      • -1: An open transaction that suffered a fatal error and can only be rolled back. 
    • ERROR_PROCEDURE() - Displays the name of the procedure that triggered the error to occur.
    • ERROR_LINE() - Displays the line of code where the error occurred. 
  • No error messages can be sent back to the application itself unless a RAISERROR command is executed within the CATCH block.


RAISERROR

The RAISERROR command can be used in both the TRY and the CATCH blocks of a TRY... CATCH statement.

  • If an error with severity less than 10 occurs, a warning message is sent back to the application and the CATCH block is not called. 
  • If an error with severity between (and including) 11 and 19 occurs and the RAISERROR is in the TRY block, control is passed to the corresponding CATCH block. 
  • If an error with severity between (and including) 11 and 19 occurs and the RAISERROR is in the CATCH block , the error is returned back to the application.
  •  If an error with a severity greater than 20 occurs, the connection to the database server is terminated and the CATCH block is not called. 

This is very important to keep in mind when trying to determine what your error message is going to do.

I will now use a quick example to show the structure of a TRY...CATCH block. The first image below shows my transaction: 


When I execute the query above, it does the SELECT statement and returns a standard SQL error message: 


However, this may not be suitable to be sent back to the application user. The image below shows an example of a TRY ... CATCH block around my transaction: 


The message can be completely customised within the print section and will display in exactly the same place as the other error, just featuring your text instead.

Now, if I wanted to send this error message back to the main application, I would replace the PRINT with RAISERROR (note that you will need to pass the ERROR_SEVERITY and then pass the ERROR_STATE):


To Be Continued...

Part 3 will focus on: 
  • The safe execution of Stored Procedures. Stay tuned! 

0

Stored Procedures (Part 1)

Posted by Danielle Smith on 11:46 in
Stored Procedures are incredibly useful as they allow for changes to the database structure and performance without having to touch the applications themselves as the procedure can be run directly onto the database. I have been exposed to them for the past couple of months during our main project and my aim in this part is to explain what they are and what they can be used for. I want to ensure that I cover these parts fully and properly, therefore there will be a separate part for each Stored Procedure example.

What is a Stored Procedure? 

Stored Procedures are multiple T-SQL statements that combined, perform an operation when it is executed. One useful feature of stored procedures is that they can be applied to many situations and almost any command in T-SQL can be used within the procedure. Stored Procedures have numerous control flow constructs which allows for the process of the data such as:

  • RETURN
  • BEGIN ... END
  • IF ... ELSE
  • WHILE
  • GOTO
  • BREAK/CONTINUE
  • WAITFOR

These will be discussed in more detail within a future blog post.

Stored procedures return data in a number of different ways:

  • Variables (both local and global variables can be used). 
  • Parameters (a form of local variable that is declared in the T-SQL itself). 
  • Return codes (which are useful for error handling).
  • Plus, result sets can be returned for every SELECT statement within the procedure.
Today's blog post is going to focus around Variables and Parameters as 2 methods of manipulating and storing data within your stored procedures. 

Use of Variables in Stored Procedures

A variable is a stored container that can store scalar values and have its content manipulated using programmable code. You are probably accustomed to using them in other programming languages and they are used in the same kind of way in T-SQL. There are 2 types of variable:

Global:

A Global variable is accessible in the whole of the SQL environment and can be used regardless on the database solution you are working with. They are standard variables therefore you cannot add new ones or change the contents of them, you can only read from them. It is possible to read from a global variable and store that data within a local variable that you can then manipulate. Global variables within SQL are declared with @@, see below for a small tabled list of some of the more common examples: 


Local:

A Local variable is declared by the user and only has use within that database project and that procedure or function. Unlike Global variables, you can create, read and write to local variables which makes them very useful and are probably more commonly used as well. Local variables within SQL are declared with @ and can be used with default values or not, see below for examples: 


Use of Parameters in Stored Procedures

Parameters work in a similar way to local variables, only these are passed to the stored procedure instead of declared. 

In the example below, I am setting up a simple stored procedure that attaches an ItemName to an ItemDescription and separates the 2 values with a hyphen or "-": 


As you can see, the parameters are @ItemName and @ItemDescription. These can also have default values such as "Fred" or they can be taken from the database.

When you want to execute your query, you can type the following line of code: 


If you wish to override any values, you can do so in the EXEC statement like in the example below: 


You will notice that once the procedure has been run, an error message will appear stating that the procedure has already been created. If you wish to make any changes to the procedure, you will have to change the CREATE statement to an ALTER statement like in the example below: 


To Be Continued...

Part 2 will focus on: 
  • Error Messages, Return Codes and Error Handling. Stay tuned! 

0

An Introduction to T-SQL

Posted by Danielle Smith on 15:07 in , ,
Hi everyone! Right, now we are starting to get down to the more complicated stuff that SQL has to offer.

Recently, I have been working with a senior developer looking at Stored Procedures, User Defined Functions and Triggers and learning how to implement them successfully within a database project.

Although programmable objects can be written in both T-SQL (Transact-SQL) and CLR (Common Language Runtime), I have been learning primarily in T-SQL so that is what my examples will be formed in for the following blog posts. As time goes on - I'm sure I will cover them in CLR too so watch this space!

For the purpose of this mini interim post - I am going to write a little bit of background knowledge about T-SQL. Really this is just to give a flavour on what's to come.

What is T-SQL?

T-SQL (or Transaction-Structured Query Language) is an invaluable extension by Microsoft and Sybase to standard SQL which includes procedural programming concepts, the inclusion of local variables and various supporting functions for data processing. Speaking from experience, I find it like a cross between VB (Visual Basic) and standard SQL. However, it is not a standalone language and has to be used in conjunction with SQL.

What is it used for? 

T-SQL is a massive central hub of Microsoft SQL Server as all applications made to communicate with SQL Server will do so using T-SQL. It can be used in many situations, of which I intend on covering the following: 

  • Stored Procedures
  • Cursors 
  • Error Handling
  • User Defined Functions 
  • Triggers (DML, DDL and LOGON)
I am also splitting these posts up into smaller more digestible chunks too because, as you can imagine, there's quite a lot to cover (plus I am learning as I'm going along, so please bare with me!) If you have any questions please don't hesitate to comment on any of my posts and I should be able to respond fairly quickly.

Copyright © 2009 SQL Genius - Personal Development of a Junior All rights reserved. Theme by Laptop Geek. | Bloggerized by FalconHive.