0
The Importance of Designing Your Database (Properly!)
Good afternoon everyone!
Today we will be discussing the importance of database design and how thinking outside the box from the offset can prevent any major database changes in the long run. Some database changes are inevitable as a system grows and may be fairly easy to implement, however, changing names of columns, names of tables and adding new relationships that interact with pre-existing ones can quickly become a complete nightmare to modify. This is because the objects that you are changing could be referenced all over the place, including within Triggers, Stored Procedures, Views and even in the back-end C#/ASP.NET code. All references would need to be re-pointed to the new names, otherwise Server Errors will be appearing all over the place and could render a system completely broken.
The image below shows an example of a flowchart that I have created for a booking system whereby a user can reserve a table at a restaurant:

If the system will have pre-existing data that comes from either a spreadsheet or a redundant system it may be a good idea to start looking at this information to help determine what database tables and fields you will need. If you can already split the data within the spreadsheet into columns then that's fantastic and really helps.
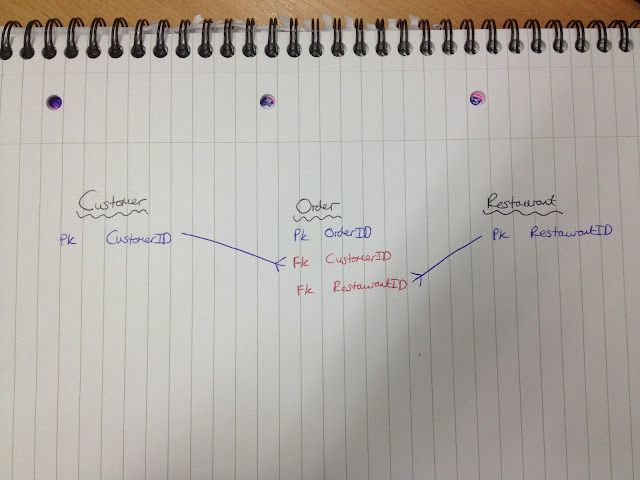
Whenever I design a database, I always hand draw what I think the final design could look like. It doesn't have to be neat at all, just providing it makes sense to you when you come to putting it in a computerised format then it is fine. I also use this opportunity to decide on table names and primary/foreign key fields, which may be easier to do after analysing pre-existing data to determine exactly what attributes I will need. Ensure that you always choose appropriate naming conventions! My blog post containing Tips on How To (Correctly!) Define Your Tables may help you. Here is a quick example of my database drawing:
.JPG)
Next, I am going to transfer my ideas into an Entity Relationship Diagram in Visio. This is where I start to think more about what columns I will need in each table and their data types. As mentioned before in a previous post, it's very important to have one naming convention and to stick to it, plus it's important to use sensible naming conventions that shouldn't require changing in the long run. It would also be a good idea to normalise your database design at this level before it has been created properly in SQL Server (For more on normalisation, read my blog post here):

Now, I can transfer my Visio design into SQL Server. You could create the tables either using SQL code or by using the designer (you should have an idea on how to do both) but for the purposes of this exercise, I have decided to create the database using the code below:

As a database diagram, it would look like this:

And there you have it! The basic design principles in order to create a database. As you can see it isn't too dissimilar from the original designs but that is probably because there wasn't much to the system. The larger the system, the more opportunity there is for errors to sneak in unexpectedly. However if you follow these simple steps, you should be able to create a pretty good database design on your first attempt.
There may, unfortunately, be occasions where you have no choice and have to rename tables and columns. If this is the case, a useful tool called ApexSQL Refactor 2013 (discovered by one of the Senior Developers at Light Speed IT Solutions) may be of use. Follow the link below for more information and to download:
http://www.apexsql.com/sql_tools_refactor.aspx
If anyone has any questions, comments or feedback on any aspect of my blog please don't hesitate to contact me. Thanks for reading!

Today we will be discussing the importance of database design and how thinking outside the box from the offset can prevent any major database changes in the long run. Some database changes are inevitable as a system grows and may be fairly easy to implement, however, changing names of columns, names of tables and adding new relationships that interact with pre-existing ones can quickly become a complete nightmare to modify. This is because the objects that you are changing could be referenced all over the place, including within Triggers, Stored Procedures, Views and even in the back-end C#/ASP.NET code. All references would need to be re-pointed to the new names, otherwise Server Errors will be appearing all over the place and could render a system completely broken.
Steps to Creating the Ideal Database Solution
It may be useful to begin with creating use cases and/or flowcharts in order to work out how customers will interact with the system. Usability of a piece of software is paramount to its success as, if it works but it's not explicitly clear on how an end user can use it, it will be as effective as a solution that doesn't work at all. You should use this opportunity to think of possible on-screen messages that may have to appear, when validation may be required for certain page elements such as username and password entry etc.The image below shows an example of a flowchart that I have created for a booking system whereby a user can reserve a table at a restaurant:
If the system will have pre-existing data that comes from either a spreadsheet or a redundant system it may be a good idea to start looking at this information to help determine what database tables and fields you will need. If you can already split the data within the spreadsheet into columns then that's fantastic and really helps.
Whenever I design a database, I always hand draw what I think the final design could look like. It doesn't have to be neat at all, just providing it makes sense to you when you come to putting it in a computerised format then it is fine. I also use this opportunity to decide on table names and primary/foreign key fields, which may be easier to do after analysing pre-existing data to determine exactly what attributes I will need. Ensure that you always choose appropriate naming conventions! My blog post containing Tips on How To (Correctly!) Define Your Tables may help you. Here is a quick example of my database drawing:
.JPG)
Next, I am going to transfer my ideas into an Entity Relationship Diagram in Visio. This is where I start to think more about what columns I will need in each table and their data types. As mentioned before in a previous post, it's very important to have one naming convention and to stick to it, plus it's important to use sensible naming conventions that shouldn't require changing in the long run. It would also be a good idea to normalise your database design at this level before it has been created properly in SQL Server (For more on normalisation, read my blog post here):

Now, I can transfer my Visio design into SQL Server. You could create the tables either using SQL code or by using the designer (you should have an idea on how to do both) but for the purposes of this exercise, I have decided to create the database using the code below:
As a database diagram, it would look like this:

And there you have it! The basic design principles in order to create a database. As you can see it isn't too dissimilar from the original designs but that is probably because there wasn't much to the system. The larger the system, the more opportunity there is for errors to sneak in unexpectedly. However if you follow these simple steps, you should be able to create a pretty good database design on your first attempt.
As a Final Word...
There may, unfortunately, be occasions where you have no choice and have to rename tables and columns. If this is the case, a useful tool called ApexSQL Refactor 2013 (discovered by one of the Senior Developers at Light Speed IT Solutions) may be of use. Follow the link below for more information and to download:
http://www.apexsql.com/sql_tools_refactor.aspx
If anyone has any questions, comments or feedback on any aspect of my blog please don't hesitate to contact me. Thanks for reading!





